My Galaxy S9 Was Hard Reset and Now I Cant Get It Working Again
You can apply Galaxy S9 recovery mode to wink new ROMs, clear Galaxy S9 cache partition, and to check recovery logs.
Although Galaxy S9 recovery mode was designed for some advanced users, you may demand some of the features, especially clearing the enshroud sectionalization to fix some problems after a major update.
This Galaxy S9 guide explains to you the functions of Galaxy S9 recovery mode, the fashion to reboot Galaxy S9 or S9+ into recovery mode, usage of the recovery mode, and methods of clearing Galaxy S9 cache partition.
What is Galaxy S9 recovery mode?
All Android phones accept a special manner: recovery mode, which allows yous to fix whatever Android problems and perform some actions (for case, patch the system) to the Android organization without loading Android OS.
In the phone storage layout, there is a special partition for recovery. This sectionalization is protected from Android Os and other partitions.
Galaxy S9 is non an exception.
If yous remember yous never used Milky way S9 recovery mode, you lot are very likely wrong.
When yous install updates (including monthly security updates) for Galaxy S9 and S9+, you may notice the phone will reboot twice automatically.
During this updating process, Milky way S9 or S9+ would reboot into Milky way S9 recovery style first to utilise the update, then reboot into Android OS so that you lot can apply Galaxy S9 and S9+.
Of course, Galaxy S9 recovery mode offers more than functions including:
- To apply Android Bone update
- To reset (factory data reset) Galaxy S9 or S9+.
- To wipe/clear Galaxy S9 enshroud partition.
- To boot into bootloader (download mode).
- To wink official or third-political party ROMs for Galaxy S9 and S9+.
- To mount /organization partitioning manually.
- To check recovery logs.
- To run a graphics exam.
Although Galaxy S9 recovery mode is seldom used for well-nigh Galaxy S9 and S9+ owners, you may need to reboot into Galaxy S9 recovery mode to fix some problem with your S9 or S9+.
In fact, most Milky way S9 and S9+ owners reboot the phone into Milky way S9 recovery fashion to clear the cache segmentation to fix some problems afterwards a major Android update.
Yous should not confuse Galaxy S9 recovery mode with Milky way S9 condom style, which is a special style of Android Os.
How to reboot into Milky way S9 recovery mode?
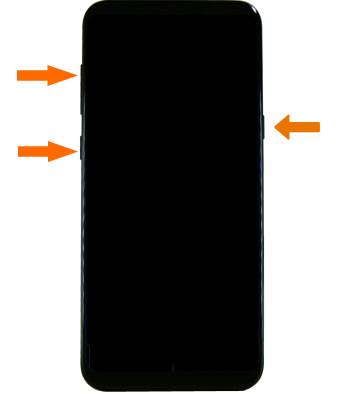
The cardinal combination to reboot into Galaxy S9 recovery mode is Bixby button+ Volume up + Power. Please refer to Galaxy S9 layout page for the location of these buttons.
You may follow these steps to reboot Galaxy S9 or S9+ into Galaxy S9 recovery mode.
Please note, it is likewise possible to reboot the phone into recovery mode with ADB commands.
Step 1: Power off Galaxy S9 or S9+
You can press and hold the ability push button for more than than 2 seconds to go the power button options every bit shown below.
Tap Ability off to power off Milky way S9 or S9+.

After Galaxy S9 or S9+ is powered off, you need to printing and hold the following iii buttons as shown below:
- Bixby button.
- Volume up push button.
- Ability button.
Yous should concur the offset two buttons get-go, then concur the power button.
If you hold power push button likewise early, Milky way S9 or S9+ may reboot normally into Android OS.
Step 3: Wait for one or two minutes
You lot need to printing and hold the iii buttons until you see the Galaxy S9 splash screen.
You can release your fingers from the buttons after yous become the splash screen.
So you accept to expect i or two minutes until you go the recovery menu.
Yous tin (and have to) ignore the process of installing organisation update and the dead Android. But y'all cannot skip them.
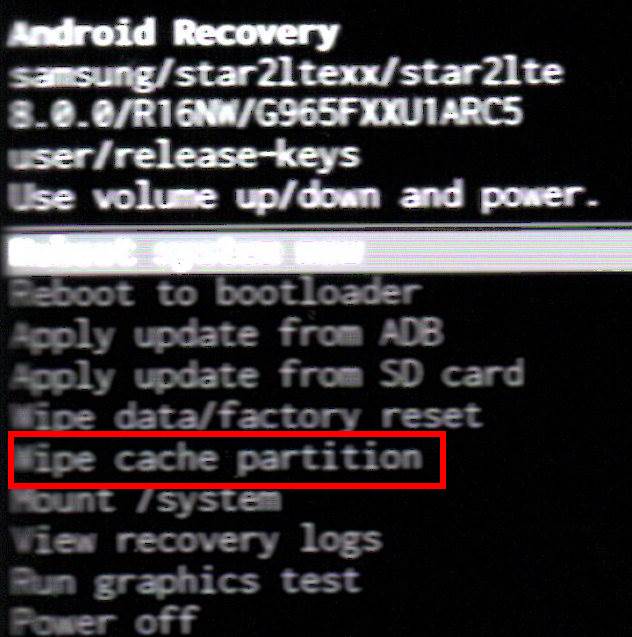
Without doing annihilation, you lot should go the Galaxy S9 recovery mode carte, as shown below, in about 1 to three minutes.
How to utilise Galaxy S9 recovery mode?
In Galaxy S9 recover mode, you can navigate the menu with volume up and down keys.
If you lot need to make a option, y'all need to utilize the power key.
You cannot use touch gestures in Galaxy S9 recovery manner.
How to clear enshroud partition on Galaxy S9 and S9+?
If y'all find Galaxy S9 or S9+ behaves erratically, especially after an update, you may try to clear enshroud division to solve many issues.
Very oftentimes, clearing Galaxy S9 cache partition usually is the final resort before factory resetting the phone when y'all encounter some problems with Galaxy S9 or S9+.
To clear Galaxy S9 cache partition, you merely need to reboot the phone into Galaxy S9 recovery fashion.
Every bit shown in the Galaxy S9 recovery manner menu, yous can navigate to wipe cache sectionalisationwith book keys.
And then use the power push button to select wipe cache segmentation.
It volition then ask you to confirm the selection.
You merely follow the instructions to clear Milky way S9 cache partition.
How to exit Galaxy S9 recovery fashion?
In the Galaxy S9 recovery card, yous need to navigate to reboot the arrangement now (the outset ane) with volume up and down keys, and then utilise the power button to select it.
Galaxy S9 or S9+ will go out recovery mode and reboot into Android OS.
If you are not patient, yous tin can also only hold the ability button for more than than 5 seconds to get out Milky way S9 recovery style and Galaxy S9 or S9+ will then be rebooted normally.
Volition clearing Galaxy S9 cache partition affect my data or settings?
No, wiping Galaxy S9 cache segmentation does not affect any of your data and settings.
The system will rebuild the cache partition automatically afterwards it is wiped. None of user data or settings is saved in Galaxy S9 enshroud partition.
But you should ever back upwardly all important information even you do not clear Galaxy S9 enshroud partition.
Can you lot reboot Galaxy S9 or S9+ into Galaxy S9 recovery way? Practice you know how to articulate Galaxy S9 cache partition to fix problems of Galaxy S9 or S9+?
If yous have whatever questions or encounter any problems on Galaxy S9 recovery style in Milky way S9 and S9+, or on wiping Galaxy S9 cache partition in Galaxy S9 and S9+, please allow usa know in the annotate box below.
The customs will help you find the answer.
For the user guide for new features of Samsung Galaxy S9 and S9+, please check Galaxy S9 new features guides folio.
For using Milky way S9 and S9+, delight check Galaxy S9 how-to guides page.
For using Galaxy S9 photographic camera, please check Milky way S9 camera guides page.
For accessories for Milky way S9 and S9+, please check Galaxy S9 accessories guides page.
For the official Samsung Milky way S9 and S9+ user guides (in PDF format), please check Galaxy S9 user guides page.
lovelessoperepien37.blogspot.com
Source: https://gadgetguideonline.com/s9/how-to-reboot-into-galaxy-s9-recovery-mode-and-to-clear-galaxy-s9-cache-partition-on-galaxy-s9-and-s9/
0 Response to "My Galaxy S9 Was Hard Reset and Now I Cant Get It Working Again"
Post a Comment